Mini Cart
Free worldwide shipping on orders over 250€
The one about vegan homemade candles
The 2nd lockdown is still here and this time most of us are experiencing lots of difficult emotions. Christmas holidays are here, but the stores and restaurants are closed, while a new term "click away" came into existence and even our grandparents must learn how to manage this! Despite this unusual situation we are having during coronavirus, there are always things we can do to creatively fill the hours we stay at home. So, I am sharing with you my latest “creativity moment”!
From when I was younger, I was crazy about candles and perfumes! There is no chance not to buy candles for the house every time I am in a home décor store! Unfortunately, the stores are closed at the moment, so I decided for this Christmas to make my own candles for myself and for my loved ones!
I chose to make soy vegetable candles with essential oils. Soy wax has a white color and thus gives you the freedom to color your candles as you wish, I stayed consistent in pure white!
See below what I needed for the candles you see in the photo!

- 3 kg candle-making soy wax
- Empty jars for filling
- Essential Oil
- 15 waxed cotton wicks with metal base
- One double boiler for the ben marie
- Silicone glue
Step 1: Insert the wick
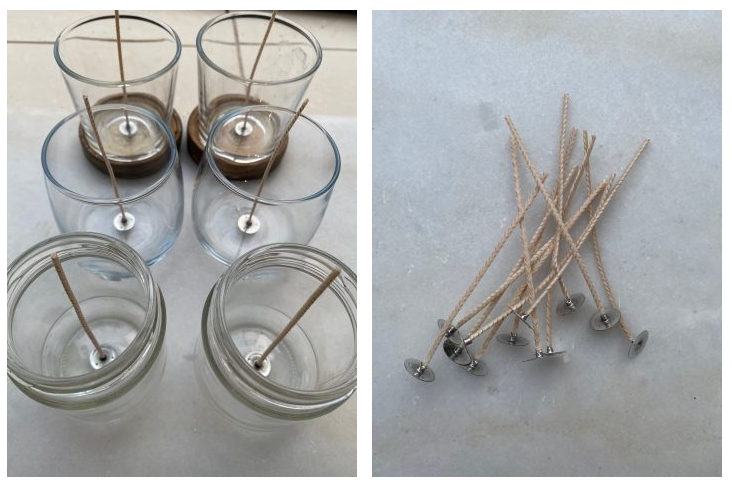
Choose wicks with the right diameter suitable for your candle vessels. (I bought number 14). The right wick, as a general principle, depends on the diameter-thickness of each candle vessel. If the wick is smaller than it should be, the candle burn only around the wick forming a pond and leaving "useless" the remaining volume of the candle, if the wick is larger than normal the candle will smoke.
Once you have found the vessels you want to fill with wax, put some silicone on the base of the wicks and place them in the center of the vessels. Let it stick for at least an hour
Step 2: Measure the wax

There are two ways to calculate the candle I needed to fill each of my containers. I started the first way and did the rest the second way.
A. (Here you will need a scale).
Put the candle vessel you want to fill on the scale and reset it. Fill the vessel with water to the point where your want t be filled with wax. Multiply the weight of water by 0.9. The sum is an accurate measurement of wax content for your vessel!
B. Measure out how much wax you would need to fill your container, then double it. That’s how much wax you will need to melt.
Step 3: Melt wax in a ben marie

Pour the wax into your double boiler and allow to melt for 10 to 15 minutes, stirring frequently. In most blogs you will read that you need a cooking thermometer to melt the wax properly. It is more correct, but I did not use it and the result was perfect in texture and appearance! The tip here is to keep it at a low temperature and be patient. The wax needs about 15 minutes in the ben marie with gentle stirring.
Step 4: Add fragrance oils & Pour the wax
When your candle wax is melted, it’s time to add fragrance oils. While this step is optional, we definitely recommend it for a lovely smell. SOS! Do not pour the candle into the container immediately after it is melted. Once you take it off the stove, give the candle about 15 minutes to cool. Don’t worry, it will not crystallize, its temperature will just drop. In the meantime, add the essential oil of our choice (I added vanilla). You should stir gently for at least 3 minutes to mix well with the wax. Keep in mind that the right temperature is when the wax becomes a little thicker, like virgin olive oil and has no blisters at all, then slowly pour it into the container. Then, slowly pour the wax into your container. Hold the wick in place, but don’t pull on it.
Step 5: Decorate it and you’re almost there!
Allow the wax to set overnight at room temperature. The next day the candles will be ready to burn. I put some Christmas decorations on top before giving them as a gift and I also bought holiday bags to put them in!

TIP: To prevent your wick from swaying in the melty wax, you need to secure it in place. Lay two chopsticks across the top of the container or pegs. Sandwich the wick in between so that it stays centered while the wax hardens.
If you have questions about this DIY project, contact me through our Instagram page @no_thinkin !!
Happy (Covid-free) Holidays!
Love,
P.